Category: Feline Diabetes
Tags: Feline Diabetes, Cat Health, Diabetic Cat Care, Insulin, Blood Glucose Monitoring, Continuous Glucose Monitor
More members are coming to us with Continuous Glucose Monitor (CGM) device recommendations from their vet. We don’t have much content regarding these devices as they are relatively new for pets, so I thought it would be beneficial to start a discussion to share pros and cons, best practices, and tips and tricks. I will cover some basics below, and please feel free to add your comments or experiences.
Special thanks to @Staci & Ivy and @Brianna & Xander for their input.
What is a Continuous Glucose Monitor (CGM)?
A continuous glucose monitor is a small device that measures a diabetic cat’s glucose levels in real time, 24 hours a day. Instead of poking your cat’s ear or paw multiple times a day with a handheld meter, a CGM uses a tiny sensor placed just under the skin to track blood sugar levels continuously. The data is sent to a smartphone or reader device and shows trends, patterns, and alerts for highs and lows. While not all cats tolerate traditional manual testing, many do well with a CGM, especially when paired with clothing or wraps to help keep the sensor in place. CGMs can be game-changing for cats and their caregivers under certain circumstances. Popular models like the FreeStyle Libre 2 and FreeStyle Libre 3 are seemingly becoming more widely recommended by veterinarians.
This sounds great, I’m going to ditch my handheld meter… not so fast. While the Libre devices are great for those who have trouble getting manual tests, there are some downsides. A couple key points: the Libre devices are not as accurate at the extreme blood glucose ranges, sensor failures or adhesion issues, cost. So hang onto that handheld for now.
CGMs are an incredible tool for people who are unable to reliably test manually. If you are able to test manually, the general consensus would be to continue that course.
How does it work?
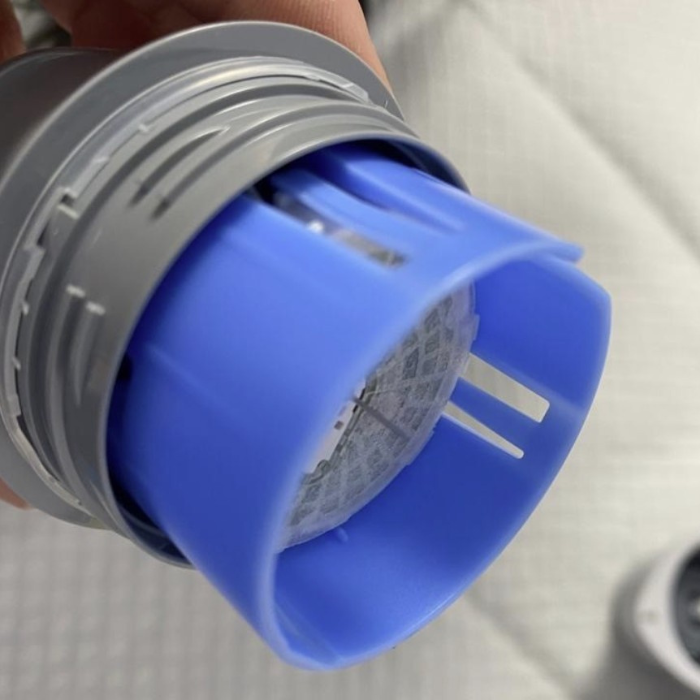
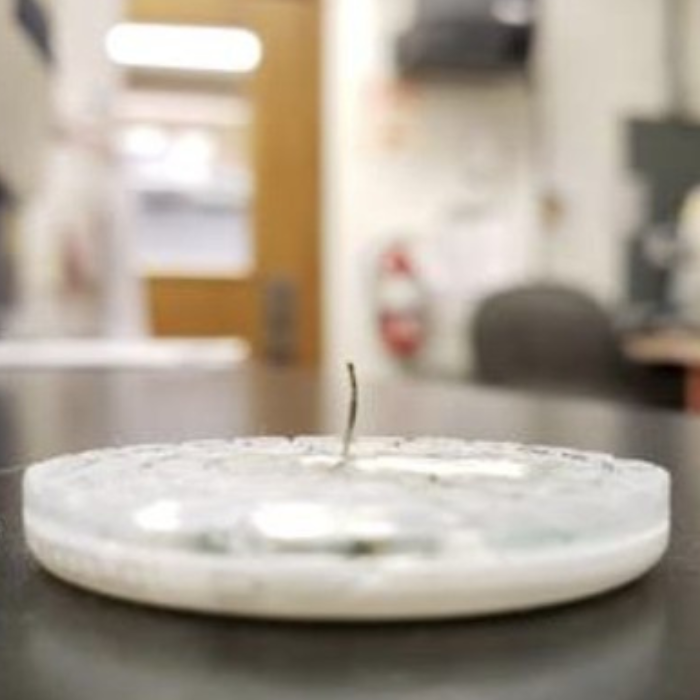
The FreeStyle Libre devices are small circular devices with a filament that is placed under the skin (often on the chest or back), measuring interstitial glucose every minute and storing data periodically. Interstitial glucose is different from measuring blood glucose traditionally. This is important because what shows up in blood glucose now would show up 10-30 minutes later on a CGM.
How to apply a FreeStyle Libre CGM:
Written by @Brianna & Xander
1. I shave a little spot as close to the skin as I can (but be careful not to hurt kitty’s skin, of course. It doesn’t have to be bald, just as short as possible) with I think this trimmer. It looks right. It’s very quiet and just charges by USB. I don’t use the clip-on guides because at least for my cat they prevent getting close to the skin. You don’t need to shave a whole lot, just big enough for the sensor and maybe an inch or so of space around it. It could probably be less, but it bothers my cat if his fur gets caught near it, so I leave some room.
2. Next, I use a Curad alcohol prep pad (I get mine at Costco but I’d imagine anything similar would work) and really clean that spot well (gently, and obviously not if there are any knicks from the trimmer). I do that with two pads, using both sides. Really clean off any excess fur, dust, oil, etc.
3. You have to wait a few minutes for that to be completely 100% dry before moving onto the next step. It takes longer than you’d think. While that’s working, you can get the Libre ready. I don’t know yet how the 3+ will work in terms of application, but assuming it’s the same as the 3, just untwist the cap and have the applicator ready to use.
4. Once it’s dry, I use a single Skin Tac wipe and just really wipe that whole area that it will be attached to. Unfold it and use different spots to make sure you really get it on there. Wait for their skin to get tacky (it takes longer than it does on your fingers), so you kind of need to wipe off your fingers and then use the back of your fingers that are clean to test it. Don’t wait any longer than it takes for it to get tacky.
5. Line up the sensor where you need it. I put my cat’s on his ribs, behind where his “elbow” would be when he bends it. It needs to not be near any skin that tends to fold or wrinkle much, but still in a relatively meaty area. Make sure you brace kitty’s opposite side (kind of like holding a football. Just give it a firm grip so that when you use the applicator, they don’t get knocked sideways). The applicator is fast and easy, just line it up, the edges touching the skin, and then press down firmly and immediately (but gently, so as not to get stuck or remove it) pull back up. No need to keep it pressed in. It has a relatively loud pop but it’s very quick. Just do it confidently and hold onto her other side. It might startle her, but it’s over quickly. After that, I press down a little on the paper edges around it just to give it some extra stick.
6. Then I scan it with my phone to activate it (it takes an hour to set up, so you want to get that going). Sidenote, if no one has mentioned this yet: unless you plan to be around nonstop, you’ll need to have it connected to a phone that you can leave at home with your cat at all times. I just use my last old phone. It’d be a good idea to have one that’s considered “supported” (you can see that here) in case you need replacements, but mine technically isn’t. With the Libre 3, anyway, it needs to stay within 33 feet of the sensor without walls or obstructions. I just leave it in a place where he tends to hang out (and make sure it can stay charged). In order to be able to see it on your own phone, you can then set up the LibreLinkUp app, and connect the two accounts. It’s not perfect, but it does let you see how they’re doing when you’re not around.
7. The next thing I do isn’t required but I like to do it. I use the Brava spray recommended in the tutorial (it’s super gentle) on a Q-tip (not too much, and not close to the sensor!) to gently try to get off a little of the extra Skin Tac around the sensor that isn’t needed. Again, not much, and not too close. You don’t want to remove the adhesive we do need. Just to get it off of the rest of the skin and maybe some fur. Then I use a damp (not dripping) water cloth to wipe off the spray since you don’t want them licking that.

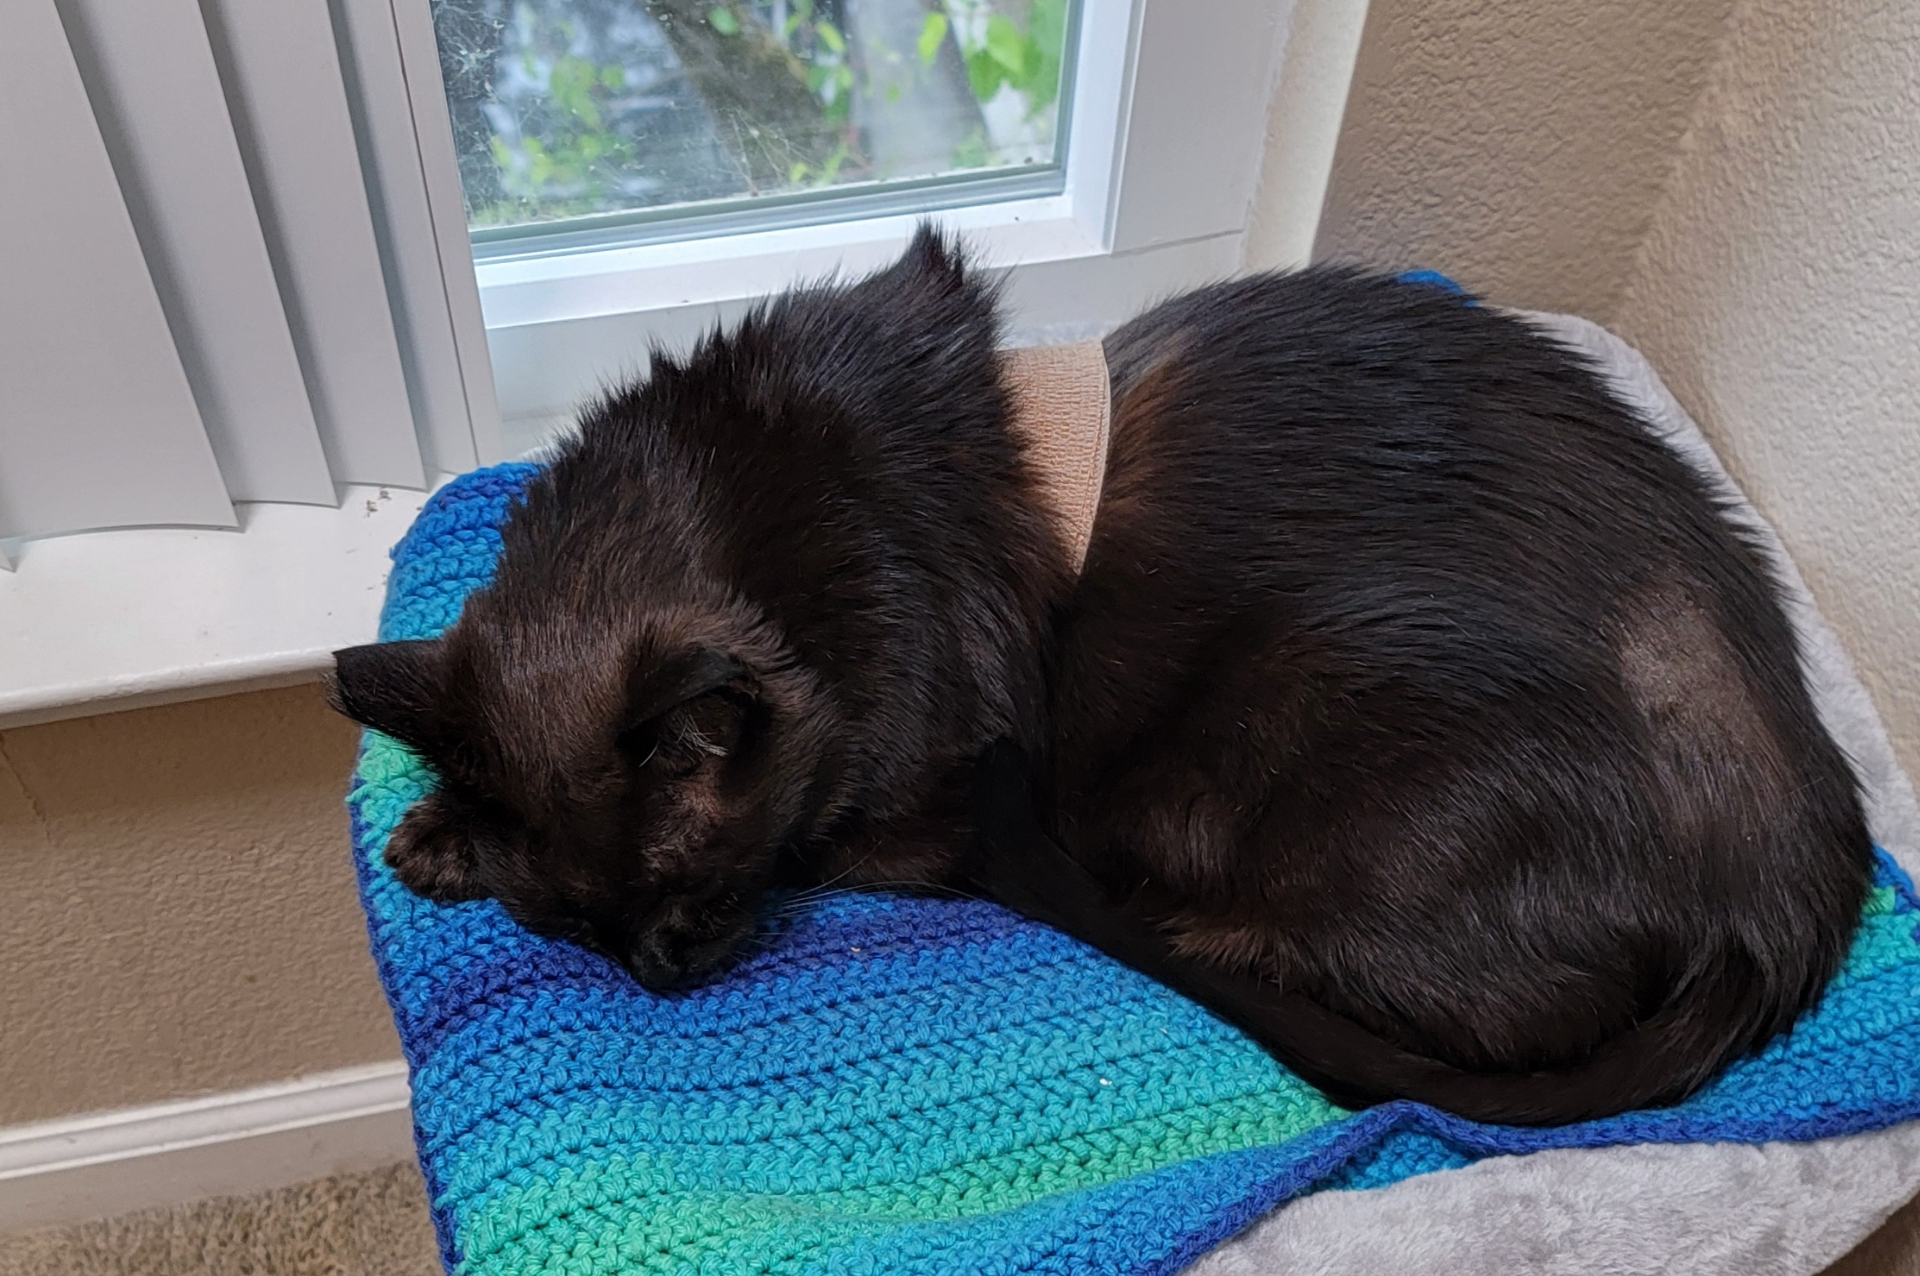
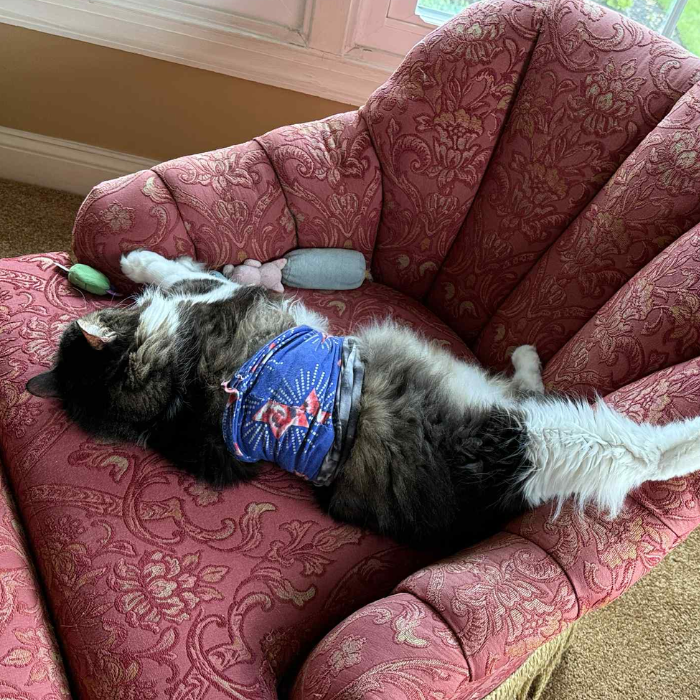
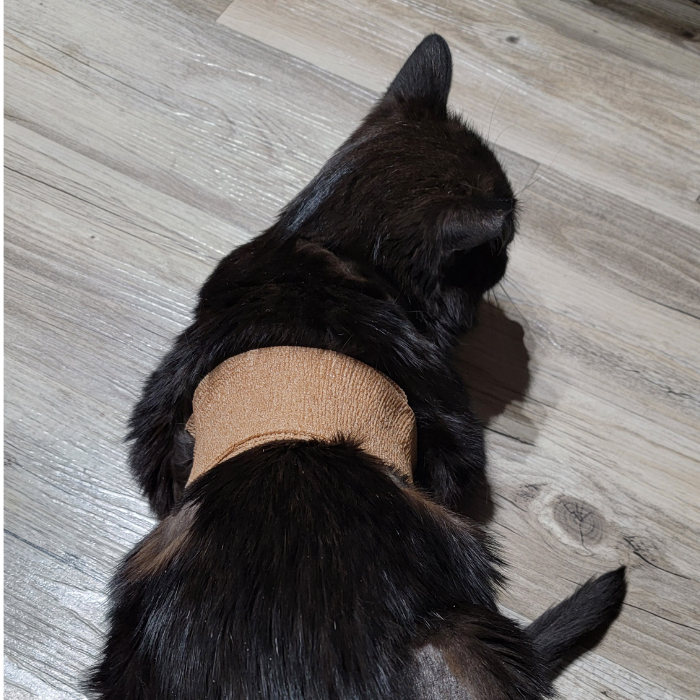
8. After everything is completely 100% dry, I wrap it. I struggled for months to try to get my cat to leave it alone. He wouldn’t. He also wouldn’t wear clothes or anything resembling it, like a Thundershirt. We lost some sensors in less than 24 hours. We’ve spent SO. MUCH. MONEY. on sensors because he ripped them off early. It was only about a month ago that we finally found the one thing he doesn’t seem to mind: just plain old self-adhesive bandage wraps. Literally just Walmart brand. Like this, but I think we use the 2″, not the 3″. Other than occasionally licking it during normal grooming, it doesn’t seem to bother him at all. No movement restriction, it’s not painful, it covers just enough. I wrap it fairly snugly (not painful, but so that it won’t move) around his ribs over the sensor. This is tricky and you’ll likely need a second person for it, because you have to kind of move their arms out of the way to make sure that it goes behind their “armpits” when they bend their arms. I hope that makes sense. It needs to be directly behind their front legs so that it doesn’t block movement but covers the sensor. You do want to make sure it lays flat/doesn’t fold in on itself, and be careful not to pinch any fur between the layers because that’d be annoying I’m sure. I wrap it all the way around about twice, then maybe cut off another piece and add a second layer for extra security.
That’s it! When it comes time to replace it, you do want to put it on the opposite side to give the little wound time to heal. I just go back and forth between the same spot on both sides every time. I apply the new one first, and then remove the old one after (to avoid accidentally getting any adhesive remover around the new site, which could prevent it from sticking). I spray a little of the Brava around the top edge of the sensor, and use a q-tip to very gently rub under the paper and slowly loosen it. Just go slow and be gentle. It shouldn’t hurt. It may take quite a few little spritzes, but the stuff is amazing and works really well. After it’s off I use some to get as much of the leftover adhesive off his skin as possible (gently). Then I use a wet (not dripping) cloth to just really wipe off that spot. You definitely don’t want them licking that spray, so it’s good to really wipe that off. If you use the bandage wrap like I do, it will be covered anyway, but you don’t want it to be all wet or sticky before you cover it up.
Limitations & Troubleshooting:
The Libre is usually considered the least accurate during the first 12-24 hours and also possibly the last couple of days. For the first 12 hours, there will constantly be a little icon of a blood drop and a magnifying glass in the app. It’s not definitely wildly inaccurate in that period, but it technically could be, so the icon is just to remind you to double check with a normal BG test before making any big treatment decisions. You can also “soak” them: 24 hours before your current one runs out, apply the new one. Don’t scan it yet, just let it sit. When you do scan it after taking the old one off, it should be accurate right away (will still have the icon though) because it’s had time to calibrate.
Heat and pressure will both affect it. Laying in the sun getting warm will make the numbers go higher, and laying on it and putting pressure on it will make it look lower. If she ever seems surprisingly low but is laying down on it, try moving her and check again after a bit to see if it goes back up. A lot of the time a very sudden straight drop is just a pressure low.
The FreeStyle Libre devices are rated for 14 days, but that applies to humans. Use of Libre devices on cats are off-label. Some veterinarians may hesitate to recommend them due to lack of formal feline-specific approvals or long-term studies.
Interpreting Results:
There can be discrepancies between readings on the FreeStyle Libre devices and traditional handheld meters. This is due to the nature of how they operate. A best practice some of our members have found is to manually test “LO” Libre readings with a handheld meter.
Best Practices:
- Keep several spare devices on hand at all times. They can fail or be pulled off at any time by the cat. I don’t want to have to wait to have someone else put it on or be without data, or have to take my cat to a vet for that to be done. It’s more stress for you and your cat, plus additional costs.
- The vet’s office tends to use glue to install them, it is highly recommended not to use any glue. The glue can flood and damage the sensor, plus it can be damaging to their fragile skin.
- Applications get easier with experience. Once you’ve done it a couple times you will get comfortable doing it.
- It’s still a good idea to keep a spreadsheet, just note that your values are from a Libre.
- I keep a tube top on my cat, previously we had used a T-shirt on her but she didn’t like the T-shirt. But most cats tolerate a T-shirt quite well. Your kitty may even get used to wearing a Libre without the need for a shirt.
- The phone you use for the Libre devices to collect data does not require an active cellular plan. I use a Libre 3, so I got my cat her own phone that stays with her at home and I can monitor her 24/7. The data is sent directly to my own phone through the Libre Linkup App. The phone operates on Bluetooth and uses Wi-Fi to send the data to your phone so that you can monitor your cat’s sensor and glucose information at all times. You can use an older phone model or purchase a used one. See this link for compatible phones and operating systems.
- Join the Libre for Dogs and Cats Facebook group. There is a ton of valuable information, guides, video tutorials, and everything you need to learn about using a Freestyle Libre sensor and what supplies you need.
Note about CGMs as they relate to dosing methods:
All of the dosing methods and information you see written on our forum were written in reference to a traditional handheld blood glucose meter. This is a very important point as the Libre readings are not directly comparable to handheld meter readings. You will have to decide some specifics regarding reductions and what works best for your individual cat.
Other Notes:
- The FreeStyle Libre 2 and FreeStyle Libre 3 are being discontinued in the US as of September 2025 in favor of the FreeStyle Libre 3+.
- In the US, we do need a prescription to purchase the Libre devices. Some of our members have found them cheapest at Costco pharmacy. One of our members noted a ~$33/each price as compared to ~$90 at other pharmacies.
Resources:
FreeStyle Libre for Dogs and Cats Document
Article by Veterinary Practice